I get asked a lot about how my methodology works. What am I thinking about when setting the light? How do I know what the settings should be.
For this post I have pulled some shots from last years workshop tour. I will explain the exposure planning as we go along. From mixing the ambient with the speedlights or overriding the ambient altogether, the knowledge of what the image should look like will help you decide.
And what should the image look like? Well, that is up to you. In photography there seems to be an endless amount of possibilities and you can pretty much do what you want. Stylistically and artistically, you can make the image you want by working with the light your way.
The neat thing is that the light works the same way, every time. So you can “learn” the light and its abilities and controls and be comfortable that the light will do what you expect it to.
I always carry a little book with me to sketch ideas in and also to document how I do something for later review. I decided to scan those extemporaneous drawings so you can see how simple it is to do the shots, and how important it can be to carry a small notebook for making notes. You don’t have to be an artist, but it sure helps to LEARN what you are doing by writing it down. I don’t do every shot, but sometimes I like to just sketch it quick and then see if there is anything else I could do.
Before we get going on this post, I want to remind you about the upcoming workshops: Akron, Omaha, Montana and Chicago. These workshops are intense and full of information that goes even beyond lighting. From professional working methods to using social media to gain exposure, we talk about photography all day long. For two full days. Visit the Learn to Light website for more information.
If you are currently looking for a new way to present your work, take a look at our Professional Photographer Websites built on the power of WordPress. Just click the Essentials link on the menu bar for more information.
Now lets look at five different portrait setups that use speedlights and ambient light.
You may want to take a look at this post for some information on calibrating your lights and learning exactly what the power is going to be at the distances you choose. My 430 and 550 are both right at f-8 at 1/8 power at about 5.5 feet. That knowledge means I have total control by power setting and distance
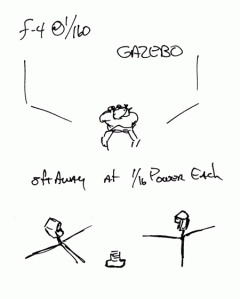
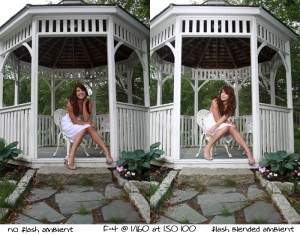
The shot above represents a neat ambient blend of speedlight and soft ambient light that wraps all around the subject. After getting the exposure with my Minolta meter I could begin to plan the lighting and what it should be. I usually take an ambient light shot without strobes so I can see how the light is falling and get an idea of the image as it will be presented.
The shot on the left shows the ambient only photograph. You can see that it isn’t bad at all, but the one on the right has a little more snap to it. F-4 at 1/160 was the meter setting and I took several shots with the ambient only before adding the strobes. The ambient shot isn’t bad, and we shot several shots with the ambient as it has a nice, soft look to it.
When it came time to add the strobes I knew exactly what I wanted to achieve. I wanted the ambient look but with a little pop from the strobes to open the shadows on her face and give the skin a brighter look. I didn’t want the strobes to overpower the ambient, just to add a little bit to the shadows. I did not change the exposure of the image with the strobes, as I knew they were so close to the ambient exposure.
Here is the diagram for the light:
Below I have the shot of Briana after some minor Photoshop work.
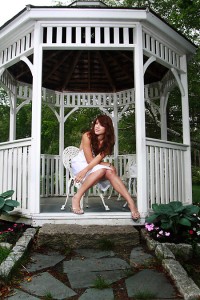
You can see how gentle the light is here. We didn't want to overpower the ambient, just add a little spark to the image.
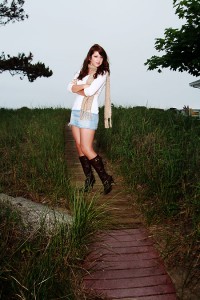
Here is a shot of Briana on the sand bridge heading over the hill. It was very cold and blustery at this time. We were both cold, so we wanted to make the shot and get it in the can before we both froze…
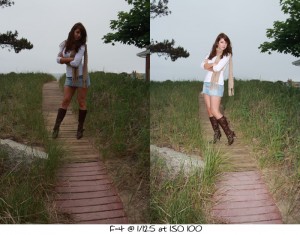
The shot with the ambient is terrible. To open the shot with the ambient would have meant that the sky would have gone white and the shot would be very flat.
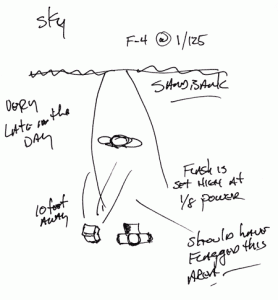
I needed then to add some strobe to it to bring the shot up in value and leave the sky dark. To add light to the subject and not change the shutterspeed was the goal. That allowed the shutterspeed to control the background (the dark gray sky) and the strobe to fill in the light up front and the subject.
Looking at the shot now, I realize I should have used a flag on the front part of the image to darken it a bit. I had to lower the values in Photoshop, as I didn’t want the image to look flashlit so much. Below is the shot at ambient and with the flash. I used a 430 on a stand, bare with no modification.
Here is the diagram for the above shot:
And here is the final shot. I brought the values down a bit in the front with photoshop and some layer blends. Creating a more even transition of light from the foreground to the background keeps the shot from looking too “over lit.”
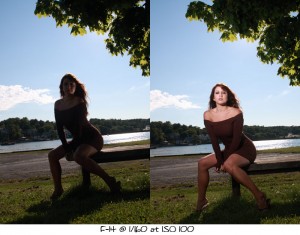
Next up is this shot of Briana in Nova Scotia:
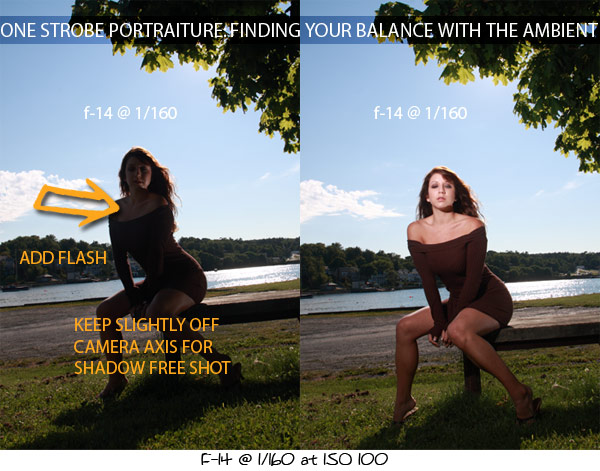
This shot shows what the background looks like without the strobe. I generally make a few shots to see what the background is going to do before I start to add the strobe. I want to see how the light would look without my added lights. What happens to the leaves and the shadow that is being thrown forward? Will there be any issues with the bench?
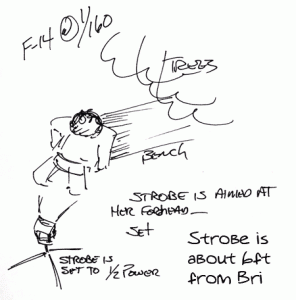
I find it very important to “build” a shot. Starting with the ambient exposures gives me a great starting point. I new that 1/160 was within my strobe sync speed on the Canon, so all I really had to do was add my strobe at the position I wanted and at the power I need to get f-14. Since I know that at 1/8 power at 5.5 feet it would be f-8, I simply had to change the power to get to f-14. 1/4 power would give us f-11 and 1/2 power would give f-16. I simply moved the light back about 6-7″ and it would give me f-14.
I made sure that the flash would not throw any shadows across the face or create any difficult lighting problems. I do that by making sure that the axis of the light was straight onto Bri, not too far to the side or too high. At the level I have the light, it throws a shadow under her chin, but it is nearly straight back. It is one of only a few flash “tells’ Making the light seem natural was my goal.
In Photoshop, I was able to make sure that the light was nice and smooth and I added a bit of contrast with Tony Kuyper’s Luminance masks, and painted some gentle highlights on the arms and dress. Overall, there was a little Photoshop, but not too much.
Here is the shot after the Photoshop:
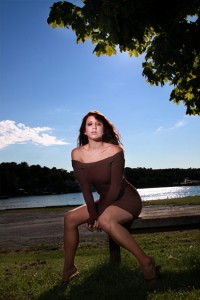
I wanted to match the background: after a shot with no strobe, I knew that it would be easy to add a strobe.
It is so important to make some shots first and to see what the light is going to do before you add some of your own. Knowing what the strobe output at specific distances makes this rather quick. At that point it is angle to subject, the angle to the camera and camera angle to the subject… the triangle that is the basis of lighting.
There are two more in PDF form if you would like to download them. Thanks for stopping by. And please let your friends know about Lighting Essentials – a place for photographers.

![Reblog this post [with Zemanta]](https://img.zemanta.com/reblog_e.png?x-id=ef32bd42-e690-46a7-821d-3f9a0bcf8fef)


Good concise explanation Don. Thanks for sharing.
Don, As always very informative. One of the issues which I struggle with when using bare strobe is the inability to avoid casting hard shadows from the flash. I guess if I carefully meter the subject to get the correct f-stop and adjust the flash power accordingly I could limit this effect, whereby the flash shadow blends with the ambient. Obviously the angle of the flash plays an important part in the equation. The shadow, albeit only slight, is noticeable on the sand bridge shot, but the one of Bri on the park bench is not noticeable due to the angle of the flash, which looks as though it\\\’s pretty much level with the ground at about head height.
Hi Nigel,
I think of the triangle that is formed between camera, flash and subject. If that triangle is wide, then shadows will be cast. The narrower that triangle becomes, the less oblique the light is to the face (nose, chin, cheeks, arms etc…) so it throws less shadow. There is also the angle of the strobe to the subject which I work with a lot. I keep the strobe at the angle of the model’s face. It still renders well from camera, but it allows no shadows on the face from itself. Easier to do with a human light stand who can watch the model and move the light accordingly, but with a good model who understands, she can ‘work toward the light’ and I get more keepers.
I’m a little confused about the aperture and shutter speed settings. Are you keeping the shutter and aperture at the same settings as when you were shooting ambient only? Or are you closing the aperture down a bit to account for the added light from the flash(es)?
Hi Squilky.
There is no change in the exposure settings at all. I have the ambient, then I add the strobe to fit the desired look. Match or Fill or Overpowering the sun.
Once the settings are found for the ambient, adding the flash is as simple as distance / angle / power.
I know that top of the line cameras do not have a built in flash, but I was wondering if this flash could be used effectively to add some fill in order to reduce the contrast of the bare main flash off camera?
Very informative. Thanks. I see what you mean about a flag on the sand bridge shot. In your diagram, where would you have placed the flag in order to block the light in the foreground? If you would have placed a flag to block the foreground, wouldn’t the grass on either side of her still be well lit. The final image looks fantastic, as if only she were lit by the flash. Is this a photoshop trick or could this have been acheived with some other equipment?
I would have placed a small flag below and in front of the flash to block the light from the foreground. Keeping the flag close, that would have kept the light off the grass. Not much more Photoshop at all.
Great tutorial….very cool.
Question for you wizz, how do you deal with the old sync speed problem in bright sunlight? For example, what happens if you are shooting outside on a bright sunny day, you don’t have shade and you want to use F2.8 and throw the background out of focus? I have heard of things such as Radio poppers which allow you to sync at higher speeds?
What are your thoughts?
Thanks
Dave
http://www.broadstonemedia.com
hey Dave.
Thanks.
As for sync speed, there really isn’t anything to do about it for the most part.
Which is why you never see those kinds of shots.
Hassies and RB’s will sync at 1/500, but that is pushing the limits for most lenses.
Help is on the way, though. Pocket Wizard has a new one that we shot at 1/2400 with an Elinchrome Ranger at half power. that thing was awesome. I know that CLS will do it as will the Canon SU system, but then the light isn’t nearly as powerful so full length and larger shots are simply not possible at full daylight.
Radio Poppers I believe will work, but not with studio or large strobe systems.
Keep watching though, new stuff out all the time.
–don
Don as you set the zoom of the flash?
I use the zoomed flashes a lot. These are not zoomed.
Thanks Don…
I was with you in Mexico, it was good to read this info again. Great refresher. I appreciate all you do… as always, thanks.
Thanks for pointing me to this post Don! It helped a ton! You rock!
The link to the PDF is broken – could you please fix this? I really love saving this guides for review later!
https://www.lighting-essentials.com/strobe-ambient-tutorial.pdf
They were not restored after the recent site attack. I am making sure they will be up at the end of the day. Sorry about the confusion.
Radio Poppers will work with studio strobes, they work with alien bees, whitelighting and zues strobes and cannon and nikon flash with remote power adjustments with the radio poppers JRX studio kit, the Radio Poppers RP cube is required for remote power adjustment with cannon and nikon flash set ups.
http://www.radiopopper.com