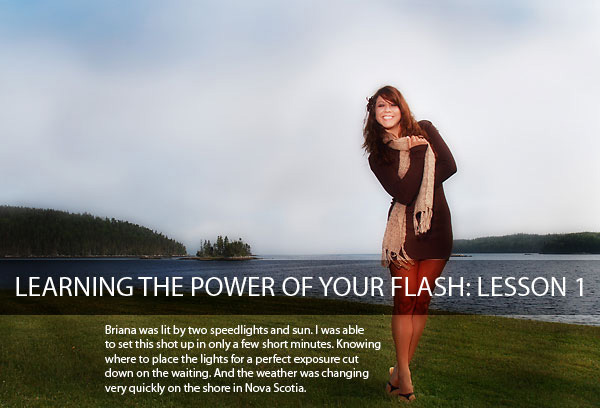
As we begin to start to find some ways to use our speedlights – or small hotshoe style strobes – for advantage, we need to learn all about them. (Welcome Strobist Readers… thanks David.)
I’m not talking about the RTM stuff. Where to put the batteries and such. This tutorial already assumes you know a little about that stuff. What I am talking about is the unit itself… in regard to light.
Let’s establish a few ground rules for what we are going to be doing. First, this isn’t an ETTL, CLS, or any other kind of electronic exposure control in the flash unit. We are talking about manual settings. Manual is where the power is.
We also must make a few demands for the units themselves: They must have variable power, some way to fire them off camera (Sony strobe units are pretty proprietary I have seen) and they should have some sort of “Zoom” for the light. This last part isn’t mandatory, but it does offer some great flexibility.
First off we have to get some relative readings. And this is crucial because once we have the readings they are pretty fixed. The strobe will do the same thing every time. That consistency works to our advantage. We can learn the flash and what it will do at the settings we give it. That makes moving quickly more possible. We know the flash so well, that setting it in a position to give us exactly what we want is now quick.
(EDIT: This tutorial is for people who may have to borrow a flash meter in order to get their readings. If you have a flash meter, by all means use that. I am not sure having a ‘cord meter’ would be advantageous other than saving you some time. And helping you visualize in a linear manner what most people take for granted… and then never learn.)
How do we learn that? Well, that part is also relatively easy.
(NOTE: this is a very old technique, and not one that I came up with. It is simply an easy to do technique that works very well, and gets you to making pictures right away.)
Let’s start with power. How bright the flash is at a given distance. For purposes of this discussion we will use the ISO of 100. We will add a table for conversion as well. At this point, the ambient light and shutter speed are not relevant. Choose a normal situation or somewhere where you can comfortably shoot. The power of the strobe is not related to the ambient light at this point. We will get to mixing the ambient with the daylight next week.
Get your light meter. What, no meter? Then get a gray card or digital target. You are also going to need about 8ft of twine or my favorite – clothesline twine – available at most supermarkets. We are going to only use a part of it, so the rest of it can go in your location kit. You can’t believe how handy 30ft of cord comes in sometimes.
Building our LoTech Meter:
Put your flash on 1/8 power. Manual setting at 1/8. Got it?
Why do we start at 1/8 power? Because it gives us a mean reading where we have the ability to go up and down with the power settings. If we start at full power, we can only go down. I like flexibility, so I do it my way – you still get the same readings of course, this is my way of doing it. Your shutter speed wont matter at this point, but pick a nice neutral one like 1/125 or so. We can go up and down from there later.
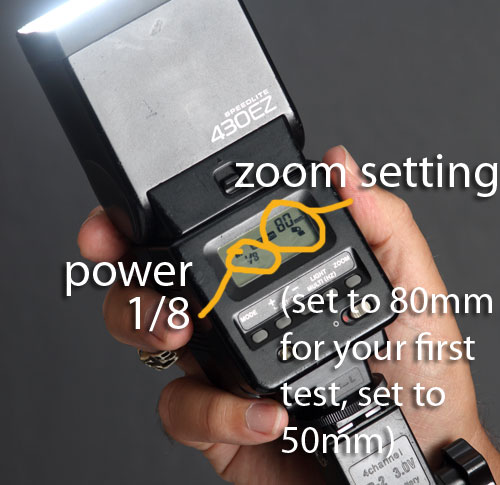
You can see I am using an older model 430 EZ here. Setting on Manual and at 1/8 power. I have this one set at zoom level of 80mm, but you will set yours to 50mm or so.
Now set the zoom to the middle point as well. Not out to 135mm and not back to 24 mm. I use the 50mm setting on my 430. These settings on the strobes exist for shaping the light when it is on your hotshoe… the longer lenses (like 85mm, 135mm) require a more narrow light, while wider lenses need a wider throw of light. When the light is narrow for the long lenses, it actually can become stronger. Put your strobe on a stand and attach a trigger to it. You don’t have to, but it is way easier and makes having a second person not nearly as important.
Alternate method 1: Light Meter.
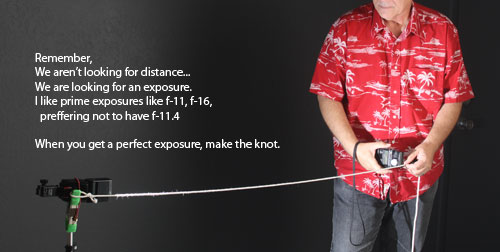
Tie a loop into the end of the clothesline cord and loop it over the strobe on the stand. Make it an easy thing to do so you can repeat it on location when you need to.
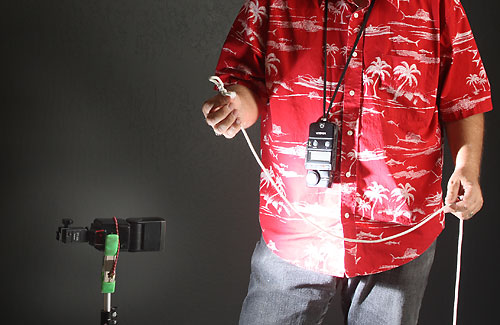
I use very lo-tech tools here. You can use whatever tools you want. I make a loop and place it at a consistant place on the light.
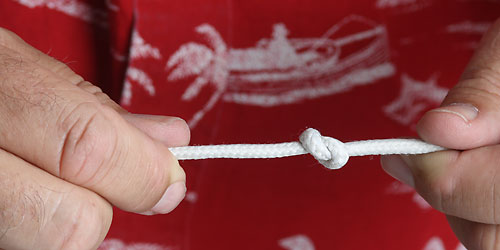
Take the string out about 6 feet (about… actual distance doesn’t matter) and pull the string slightly taught. Fire the flash for a reading straight at the meter. Check your reading. (Make sure you are still on 1/8 power.) We are looking for an exact reading, not a little over or a little under. An exact f-stop. F11, not F9. When you get the meter in the position to get an exact F-Stop… and you are out about 6ft or so, then make a knot in the cord at that point.
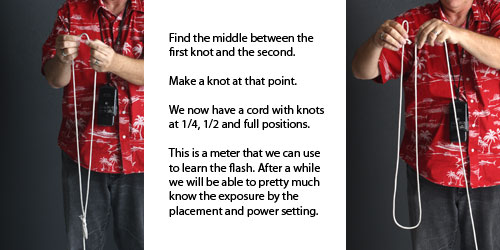
Remove the loop around the strobe and double the length. Make a knot at that point and cut the cord. You should now have a long piece of string with a knot in the middle. Good.
We have our meter in basic form. Now take the length between the middle knot and the loop and make a knot in the middle of it. Ending up with a cord with a loop and a knot half way to the middle knot and a final knot at the end.
Alternative method 2:
Setup and method is the same, but we are using a gray card instead of a meter. The camera is mounted next to the strobe and we place the gray card at a distance to get a centered spike in the histogram. Dead center, not to one side or the other even by a spec… dead center.
Here is exactly how I would do it. Place the strobe next to camera and aim it toward a gray card on a stand. Make sure you fill the frame with only the gray card, no extraneous background. Put the camera on f-11. Shoot the shot and check the histogram. It should be dead center. If it isn’t, you can adjust as needed. When you find that spot where the histogram spikes dead center, it will be the point to start.
(EDIT There was mention that the math here does not exactly match the “Inverse Square Law” as it truly exists. That is absolutely true. However, ISL only applies to point source light in a specific shaped parabolic umbrella. My ‘cord’ meter is not that exact, and you may have to adjust a little bit. I know that I have used it in decades before – on chrome – and it was damn close. We are looking for damn close here… we will always want to tweak. However, if you want to do the math correctly it would look thus:
— 2x – 2.8x – 4x – 5.6x – 8x
Now that puts that center forward knot at about a 1/4 stop under (2.8 slightly less than 3) and the back center area about a half stop under as well (5.6 being slightly less than 6). Theoretically… Next time you all shoot ‘theoretically’ let me know how that worked out for you… I shoot real world pictures. So should you. This is photography, not physics. Try it… then tell me it doesn’t work.
Just remember also that the cord meter costs less than twenty cents. And for twenty cents, it is simply amazing. Next week we get off of ‘theory’ and put it to use. We will all see the results.)
When that center spike is achieved, begin the knotting procedure that is above. You will end up with the same length of string with the knots as indicated.
Now let’s look at our ‘meter.’ We know the f-stop at the middle knot is what we metered it to be. I am going to use f-11 for our discussion as that is what I have on my 430. The knot halfway to the strobe is two stops brighter. (Inverse Square Law…) and is therefor f22. The knot at the very end is two stops less than the middle knot, f-5.6.
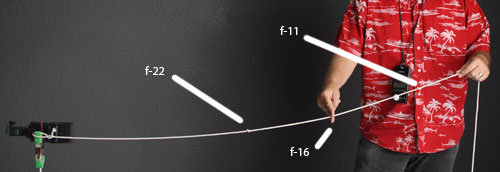
After we have the cord knotted, we have a point to start to understand that placement can be critical for using the power for perfect exposures.
Now let’s put some thought into it. If the middle knot is f11, we can make it f16 by increasing the power to 1/4 on the flash or decrease it to f8 by changing the power to 1/16. Choices… These changes also affect the knots in the cord at the other places as well. So we have a repeatable tool for finding the exact power/f-stop we need on most situations.
And the light doesn’t change. It is constantly coming out at that power as long as we have it on that setting, at that distance.
Can you do this with your umbrellas? Absolutely. Warning though, the Inverse Square Law is not quite as accurate so it is better to actually make the readings at the knots that you use. Then the exposures are exactly right. I rarely use my umbrellas at distances larger than 6ft, so that is the basic distance I made my first ‘meter’ to. With adjustment knots in between of course.
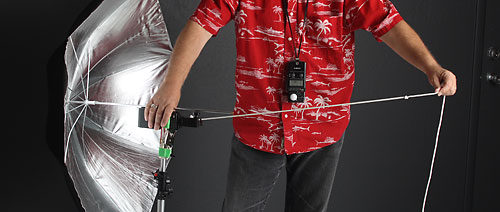
Finding the exposure with your umbrella is just as easy. Be aware that the fall off is not quite as accurate as the Inverse Square Law, so you may have to make some manual exposure placement knots.
We can now accurately know what our flash units are doing when we pop the trigger.
As an addendum, you may change your flash to the wide angle setting and do it as well as with the more zoomed out flash. You will find that the power will drop when you go for a wider angle and increase when the light is more focused as for longer lenses. Hmmmm… more options.
Assignment for next Monday is to create a string meter for both your bare flash and your umbrella (whether you shoot predominantly in bounce or shoot thru, it doesn’t matter. Just make sure you make your meter for the method you use the most.) Take a few shots to make sure you understand the light coming from the flash is consistent.
We will be putting the tool to the test on next weeks assignments.
Oh, and BTW… 10 points off for making fun of my Hawaiian shirt. Sheesh.
Special thanks to James Alan for making the shots of me and the rope.



Thanks Wizwow. I already carry a 5 yard retracting steel tape measure in my bag (archaeological photography – it helps out a lot!) – this post made me realise how I can add extra functionality to it. A few small white stickers on the steel tape, marked up appropriately….
Great Whyte
Great Whyte,
I used to carry one of those large metal ones too. It is also true that I used black marker on the reverse side. They work just as well, but make sure you don’t poke your model in the eye with it. That always makes the shoot go poorly. 😉
Wizwow,
most of my models are old bones….. 😉 I’m sure they wouldn’t mind! On a dig, I typically use my flash to put some light into shadowed parts of the trench.
OTOH, I shoot living people as a hobby, so I’m really happy to be here and on Strobist to learn about creative uses of light. Am I right that your technique is assuming no ambient contribution to the exposure (I think that’s a stupid question, but on the internet, anonymity allows me to ask stupid questions!
Great Whyte
WIZ, I really am going to go and do this ! I also may break down and buy a flash meter ( if I then remember to use it ) Can you come back to florida soon, I think I need a refresher course 😉
Why would anyone who knows wizwow make fun of his Hawaiian shirt? Especially when it is a standard wardrobe item at any lighting essentials venue.
Now when the hat and the diana are added…. that’s a whole ‘nuther story!! LOL!
Just promise us that you won’t start wearing bermuda shorts with gartered dress socks and wingtips.
😉
Found this really useful. is there are need to set a shutter speed, and if so what value?
Michael
miptog.
I altered the copy to make sure, but at this point shutter speed is not important. Choose a middle one like 1/125 and you should be good.
cheers
Don, great post. This might actually make the inverse-square law explainable!
One question, you mention, “The knot at the very end is two stops less than the middle knot, f-4.” If the middle knot is f/11, wouldn’t the end knot be f/5.6?
Looking forward to the followup post.
– Ron
I thank you for such a useful post. Can’t wait for part two.
Nice shirt. 😉
Would someone with a light meter who’s completed the exercise with Nikon SB-24 and/or Vivitar 285HV please post knot measurements here (or email them to me)?
Thanks for a brilliant post, I have been struggling with exposure on off camera flashes, and this is just what the doctor ordered 🙂
Keep up the great and informative postings !
Thanks WizWow! Awesome post.
JPL
wow… can’t believe I missed those 10 extra points… but I have several shirts similar to that and one MUCH more obnoxiously bright, so maybe I’m immune.
Great post.
Excellent tutorial – you presented the “rope method” at the Hfx seminar, but my brain needed a second try with diagrams to really get it 🙂 Btw – I think there’s a typo in your writeup – “Now let’s put some thought into it. If the middle knot is f11, we can make it f16 …” The middle knot is F22 not F11?
Looking forward to future posts!
Hi Chasm,
the middle knot of the entire rope is f-11, between it and the strobe you will find f22 near the middle there.
See the diagram for full explanation.
Glad you are getting it now. It is good information to have at your fingertips.
cheers
Wonderful post and very useful!
Is there a way you can explain in a bit more details the option 2: no light meter ? A diagram of setup and more details on where and how you used the gray card would be nice.
Unfortunately I’ve got no meeter and would be great if someone would gimme the details for the SB-600 and 800 at zoom 50mm.
Thanks!
C
Hi Wizwow, first of all great site!
Some assistance please if you would with the above test…
i have the same flash unit as well the 430EZ. Using the 2 method without the flash-meter, which F stop do you advise for the test, i attempted the exercise last night but had mixed results because i was unsure which F stop to use ie F11 for instance and which lens with my 350D. The lenses i have are: the kit lens, Ef 50mm F1.8 and the Sigma 55-200 F4-F5.6. Any assistance most appreciated.
Garby.
My Canon S3 IS tops out at F8. Should I be setting my aperture in the middle somewhere (4.0) for this exercise?
Hi, I tried this today and was disappointed with my results.
I was bouncing a Nikon SB800 into a white umbrella.
Settings on my flash were ISO 200, Shutter speed 1/250, 50mm zoom at 1/1
Settings on my Sekonic L-358 was ISO 200 with a 1/250 shutter speed
I was getting F 11 at 2 feet with full power could not do 1/8 power becuase of those readings.
Did I have the shutter speed to high?
Just wanted to say THANKS for this tutorial! Well, ALL the articales/tutorials/information found here is wonderful, this is just the first one I\’ve read. This is the kind of lighting I \’ve been wanting to learn. Gotta get some string and get started today!!
Can someone answer a question for me about this: I am testing my SB800 speedlight using this tutorial but the one thing which is not mentioned (likely due to the fact that Wizwow was using a different flash from mine) is what to set the f-stop on the flash at? I set the ISO to 100 on both it and my flash meter, zoomed to 55mm, speed at 1/125 — but do I also need to set the f-stop for this test and if so, what’s a good starting point?
Thank you very much — both for any assistance with this question and for all the wonderful tutorials on this site!
Hi Tina.
You cannot set the f-stop. That is what the test will determine. You have the flash set to manual at 1/8 power. Put your meter or gray card about 6ft away and make your first test. If it is dead on to an f-stop mark it… if it is not, tweak until it is dead on an f-stop (like f8 or f11… not 8.5 or 7.1.) Find it at one of the prime f-stops. If you are using a meter, note the change and make distance from flash movement. If you are using a gray target slightly move it toward or away from the flash to get that histogram to be dead center.
At that point, you will have the f-stop for your flash at 1/8 power. The rest is then explained in the article. Let me know if you need some more help.
Thank you Wizwow! This worked perfectly (just as you said), and I have now made string meters for my flashes. Now I just have to do the same thing with my umbrella!
This is a great site. Between LE and Strobist I might actually (finally) be able to figure out the whole lighting with flash thing!
Inverse Square Law is accurate for umbrellas.
You just have to measure from the fabric of the umbrella.
Well, it is somewhat close, but not accurate enough for me to consider it to be the same. The ISL is based on a highly polished parabolic reflector. An umbrella presents a different set of lighting parameters.
While it is certainly close, it isn’t enough for me to consider it accurate. Close, but not exact.
I do recommend that you measure from the fabric center of the umbrella if you are going to work on some base settings, but then it is much easier to measure from the stand as long as the umbrella shaft is at the exact point each time.
Nice site!
Although I am experienced still stimulates the creative process
Thanks
I have set this up just the way it was described and it worked perfectly. I made couple of ropes for my friend with the same kind of lights that i have and he was not able to get the correct exposure. My question is does the enviroment that you take the initial reading matters? Do you have to at all times in new location take your readings again using the same unit. This will definately clarify a lot of misunderstanding that we are going through here.
Just to mention the information is absoluteley awesome and i love it a lot.
Very useful post. Ponravilos solution with knots
Great info and this site is bookmarked!
I enjoyed doing this project this past weekend. Learned a lot. Thanks !
how do I find part 2 of this???
Great article! Where is Part Two!?
Part Two https://www.lighting-essentials.com/one-speedlight-some-examples/