WELCOME TO THE CLASS… ENJOY LEARNING.
This is Lighting Basics… a way to get a fundamental instruction in the art and science of photography. It is geared toward beginners, and those who are mid level but have not had formal training of any kind. Please do all the assignments, it will help you more fully understand photography and how to make better photographs.
— Don
Light and Exposure:
Understanding the qualities of light and exposure means we have to master a tool that is part of our camera system… the light meter.
Here is a link to my UDEMY class in using a light meter. We discuss the handheld meter and the meter in your camera. The class is free, and I want you to start there.
I want you to study the chapters 1 – 9 and understand that information. The goal of this first exercise is to acquaint yourself with the power of understanding a light meter.
Note: If you do not use a handheld meter, do not worry about it. Just watch to understand the principles of how a handheld meter works. It is also important to know that your camera is equipped with a reflective light meter… so it works the same way as the reflected light meter on my handheld meter.
You only have to go through the course up through Lecture 9. Please go through all the lectures up to lecture nine so you can do the following assignments.
Camera meter settings:
I usually recommend using the spot meter setting or at least the center weighted meter setting. With my camera on spot meter, I can use it very much like the handheld meter in the videos you watched. I can pick out and choose what I want my light metering to be based on. I can move in close to fill the frame with a gray door or a black shirt… and get the reading I want. I then make the exposure based on what I know… that black is reading two stops OVER and white is reading two stops UNDER. Or damn close anyway.
For the assignments here, please use your camera on spot or center weighted and make as close to accurate reading EXACTLY on the part of the scene you want to use to base your exposure.
Assignments:
- Find something black to photograph. Car tires, black leather jacket, a small pile of charcoal… something black, but NOT shiny. Make an exposure based on what your meter says, then make an adjustment in your mind to where you want to “place” that black and take another exposure. Note where the exposures fall and what you did to compensate for the obviously incorrect exposure that was indicated by your camera meter.
- Find something white to photograph. Brides dress, white shirt, white brick building. Make an exposure reading based on the reading and then adjust in your head to make a second exposure. Note where the exposures fall and what you did to compensate for the obviously incorrect exposure that was indicated by your camera meter.
- Look around your location and find subjects that look like they are middle gray. Meter them with your camera and shoot the image with that exposure.How did you do? Is that exposure based on what you considered middle gray correct? If it is, find another subject. If not… where does it fall? If it is too light, it will be necessary to move the exposure down to compensate. If it is too dark, open the exposure till it is correct.
- Repeat the above for at least 30 minutes. Becoming familiar with how the meter works in your camera is very important and will be a real lifesaver when you need an accurate exposure fast.
You can see in this portrait of our dear leader… heh… where we found the middle gray reflectance to base exposure on.
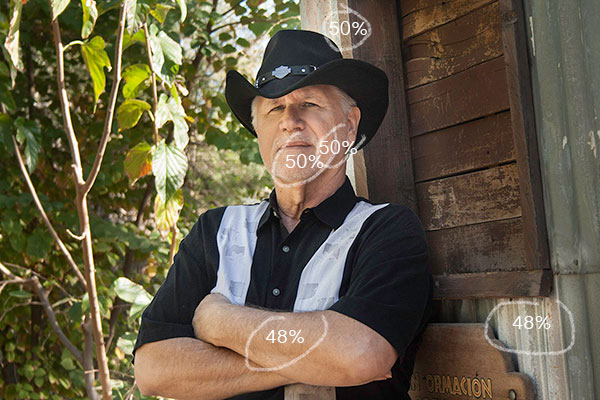
And here is the image in grayscale so you can see how close the reflectances are without color involved.
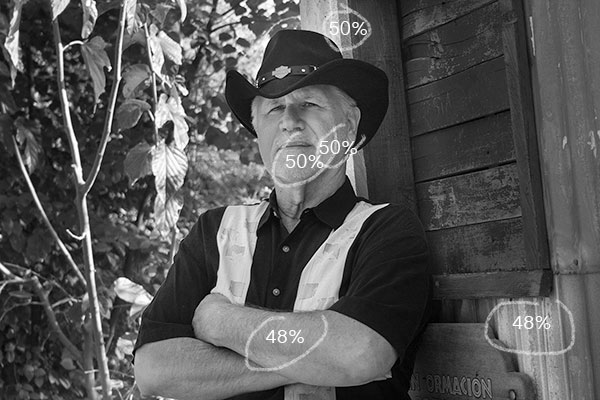
Remember that the meter does not see colors, it sees the amount of luminance that the subject is reflecting. You can more clearly see in the second shot how close all the reflectances are.
When you are comfortable using the spot meter to make readings, and your mind to adjust those readings to make the exposure correctly, you can move on to the next assignment.



That lesson has helped me get the correct exposure finally,thanks
Finished first assignment how do I get to the next one?