Lighting Basics:
Class Four
Light does the same thing every time.
Read the above again, please.
Because it does.
Can you imagine what would happen if every time we pushed a key on a piano we got a different note? How would we make music? If 2+2 is occasionally something other than 4, how would we unlock the mysteries of science with math? If a foot was ‘sorta between 9 and 13 inches’ how would anything ever get built?
Light is the same thing. It has parameters that do not change. It has science that is repeatable and expected and managed built in to it.
It is light.
We can use the sameness and repeatability of light to understand and use light as photographers. We simply have to understand the characteristics of light, and the basics of how it works to be able to manage them.
Light is brighter the closer we are to it. Always.
Light falls off faster the closer we are to it. Always.
While light can be diffused, we can not bend it around corners. Always.
The brighter a light source is, the farther it travels and can be seen.
The farther we are from a light source, the smaller it seems to us.
The farther we are from a light source, the less powerful it is to us.
Always.
There are a couple of absolute rules to learn (and believe me when I say I am not into rules at all) and understand and this is one of them:
“LIGHT FALLS OFF AT FOUR TIMES THE POWER AT TWICE THE DISTANCE.”
The “Inverse Square Law”… yeah, it is terribly scary sounding.
First, it has the word “inverse” in it and what the hell does that mean, then of course it is “squared” and that brings up memories of Mrs. Bartholomew’s algebra class… eeek! And finally… it is a LAW! Scary stuff… but, let’s forge ahead because it is NOT as scary as it sounds.
And it is one of the fundamentals we MUST learn to understand lighting. (I know there are a bunch of photographers wide-eyed right now thinking – “WTF is he doing jumping in at the ISL right off the bat like that?”) Shut up… THIS is probably the single most important understanding of lighting that there is… so much depends on understanding this basic concept.
Let’s take a look at what we really mean by the ISL…
Take an average 8×10 photograph and ask yourself how many 4×5 images you can make out of a single 8×10?
If you answered two, you only counted one edge… and you forgot that the 8×10 is FOUR times the size of a 4×5. Double the 4 to 8 AND double the 5 to 10.
So we doubled one of the lengths, and quadrupled the amount of square inches of coverage. We doubles 4″ to 8″ and that AUTOMATICALLY doubled the 5″ to 10″. And that quadruples the size of the image… not doubling it.
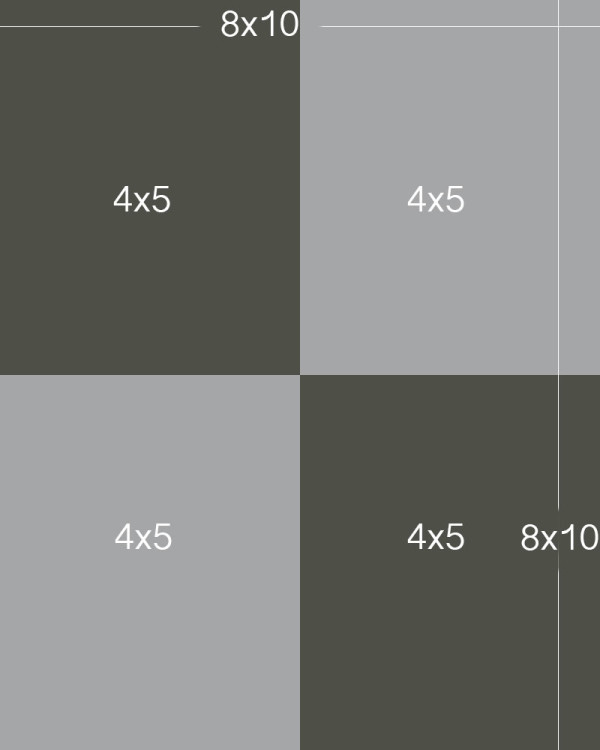
So if we understand that light is the same way… that it comes from a source both horizontally and vertically, we can see that if we double one distance – horizontal, we automatically double the other distance. – vertical.
If we were using a light that covered 4×5 at 2 feet, and backed up to have it fill an 8×10, we would have to back up to 4 feet. One foot for each side of the rectangle. At three feet back, we would still not be showing the edges… so we would have 4 times the coverage at 4 feet than we did at 2 feet… and we would be farther back from the 8×10, so the light is less powerful. Four times less powerful.
This basic knowledge of how the light works – every time – is imperative for us to wrap arms around and be able to control.
Question from that guy in the back there… “does it do the same thing in a softbox?”
Yes… mostly. Close enough to work with the knowledge. Anytime we modify a light, we can certainly understand that something is going to change… cause we, well… MODIFIED it.
And no, the ISL is NOT absolutely faithful when we put a softbox or an umbrella or something on the light… but it is damn close and well within the parameters WE need it to be. Yes, we will have to finesse it a bit, but there is a big difference between finessing it and not having a freeking clue.
Here is a link to a very good tutorial on the Inverse Square Law.
And another good link with a very good illustration.
Building a Tool for Exposure Based on the Inverse Square Law.
Let’s start with power. How bright the flash is at a given distance. For purposes of this discussion we will use the ISO of 100. We will add a table for conversion as well. At this point, the ambient light and shutter speed are not relevant. Choose a normal situation or somewhere where you can comfortably shoot. The power of the strobe is not related to the ambient light at this point. We will get to mixing the ambient with the daylight next week.
Get your light meter. What, no meter? Then get a gray card or digital target. You are also going to need about 8ft of twine or my favorite – clothesline twine – available at most supermarkets. We are going to only use a part of it, so the rest of it can go in your location kit. You can’t believe how handy 30ft of cord comes in sometimes.
Building our LoTech Meter:
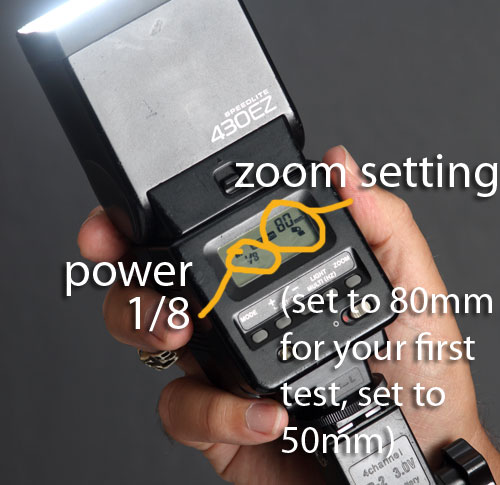
Put your flash on 1/8 power. Manual setting at 1/8. Got it?
Why do we start at 1/8 power? Because it gives us a mean reading where we have the ability to go up and down with the power settings. If we start at full power, we can only go down. I like flexibility, so I do it my way – you still get the same readings of course, this is my way of doing it. Your shutter speed wont matter at this point, but pick a nice neutral one like 1/125 or so. We can go up and down from there later.
You can see I am using an older model 430 EZ here. Setting on Manual and at 1/8 power. I have this one set at zoom level of 80mm, but you will set yours to 50mm or so.
Now set the zoom to the middle point as well. Not out to 135mm and not back to 24 mm. I use the 50mm setting on my 430. These settings on the strobes exist for shaping the light when it is on your hotshoe… the longer lenses (like 85mm, 135mm) require a more narrow light, while wider lenses need a wider throw of light. When the light is narrow for the long lenses, it actually can become stronger. Put your strobe on a stand and attach a trigger to it. You don’t have to, but it is way easier and makes having a second person not nearly as important.
Alternate method 1: Light Meter.
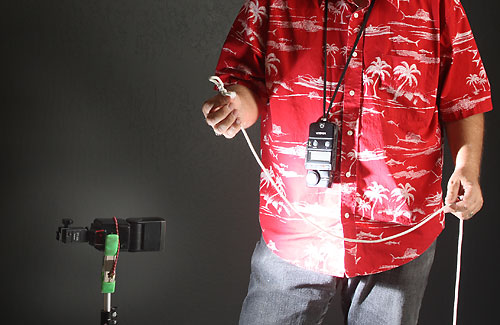
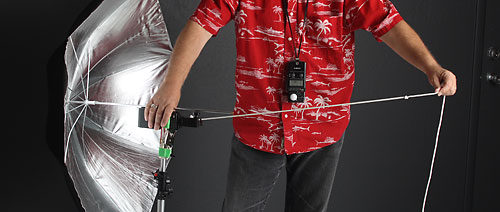
Tie a loop into the end of the clothesline cord and loop it over the strobe on the stand. Make it an easy thing to do so you can repeat it on location when you need to.
I use very lo-tech tools here. You can use whatever tools you want. I make a loop and place it at a consistant place on the light.
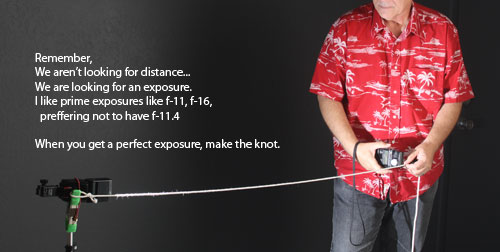
Take the string out about 6 feet (about… actual distance doesn’t matter) and pull the string slightly taught. Fire the flash for a reading straight at the meter. Check your reading. (Make sure you are still on 1/8 power.) We are looking for an exact reading, not a little over or a little under. An exact f-stop. F11, not F9. When you get the meter in the position to get an exact F-Stop… and you are out about 6ft or so, then make a knot in the cord at that point.
We are not looking for a fixed distance like 6feet, rather a fixed F-Stop like F-11
Gratuitous shot of a knot for anyone not knowing what a knot was. Sorry… Heh.
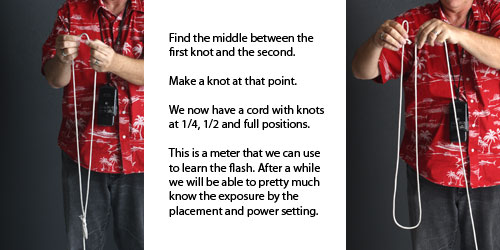
Remove the loop around the strobe and double the length. Make a knot at that point and cut the cord. You should now have a long piece of string with a knot in the middle. Good.
We have our meter in basic form. Now take the length between the middle knot and the loop and make a knot in the middle of it. Ending up with a cord with a loop and a knot half way to the middle knot and a final knot at the end.
We want to have a knot in the middle to give us another guide point
Alternative method 2:
Setup and method is the same, but we are using a gray card instead of a meter. The camera is mounted next to the strobe and we place the gray card at a distance to get a centered spike in the histogram. Dead center, not to one side or the other even by a spec… dead center.
Here is exactly how I would do it. Place the strobe next to camera and aim it toward a gray card on a stand. Make sure you fill the frame with only the gray card, no extraneous background. Put the camera on f-11. Shoot the shot and check the histogram. It should be dead center. If it isn’t, you can adjust as needed. When you find that spot where the histogram spikes dead center, it will be the point to start.
(EDIT There was mention that the math here does not exactly match the “Inverse Square Law” as it truly exists. That is absolutely true. However, ISL only applies to point source light in a specific shaped parabolic umbrella. My ‘cord’ meter is not that exact, and you may have to adjust a little bit. I know that I have used it in decades before – on chrome – and it was damn close. We are looking for damn close here… we will always want to tweak. However, if you want to do the math correctly it would look thus:
– 2x – 2.8x – 4x – 5.6x – 8x
Now that puts that center forward knot at about a 1/4 stop under (2.8 slightly less than 3) and the back center area about a half stop under as well (5.6 being slightly less than 6). Theoretically… Next time you all shoot ‘theoretically’ let me know how that worked out for you… I shoot real world pictures. So should you. This is photography, not physics. Try it… then tell me it doesn’t work.
Just remember also that the cord meter costs less than twenty cents. And for twenty cents, it is simply amazing. Next week we get off of ‘theory’ and put it to use. We will all see the results.)
When that center spike is achieved, begin the knotting procedure that is above. You will end up with the same length of string with the knots as indicated.
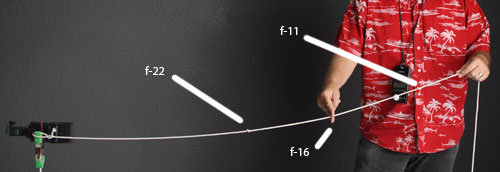
Now let’s look at our ‘meter.’ We know the f-stop at the middle knot is what we metered it to be. I am going to use f-11 for our discussion as that is what I have on my 430. The knot halfway to the strobe is two stops brighter. (Inverse Square Law…) and is therefor f22. The knot at the very end is two stops less than the middle knot, f-5.6.
After we have the cord knotted, we have a point to start to understand that placement can be critical for using the power for perfect exposures.
Now let’s put some thought into it. If the middle knot is f11, we can make it f16 by increasing the power to 1/4 on the flash or decrease it to f8 by changing the power to 1/16. Choices… These changes also affect the knots in the cord at the other places as well. So we have a repeatable tool for finding the exact power/f-stop we need on most situations.
And the light doesn’t change. It is constantly coming out at that power as long as we have it on that setting, at that distance.
Can you do this with your umbrellas? Absolutely. Warning though, the Inverse Square Law is not quite as accurate so it is better to actually make the readings at the knots that you use. Then the exposures are exactly right. I rarely use my umbrellas at distances larger than 6ft, so that is the basic distance I made my first ‘meter’ to. With adjustment knots in between of course.
Finding the exposure with your umbrella is just as easy. Be aware that the fall off is not quite as accurate as the Inverse Square Law, so you may have to make some manual exposure placement knots.
We can now accurately know what our flash units are doing when we pop the trigger.
As an addendum, you may change your flash to the wide angle setting and do it as well as with the more zoomed out flash. You will find that the power will drop when you go for a wider angle and increase when the light is more focused as for longer lenses. Hmmmm… more options.
Assignment: Create a string meter for both your bare flash and your umbrella (whether you shoot predominantly in bounce or shoot thru, it doesn’t matter. Just make sure you make your meter for the method you use the most.) Take a few shots to make sure you understand the light coming from the flash is consistent.



There used to be a young lady’s science fair project on the web about ISL and photography, a bare flash tube to modifiers to a laser. Except for the laser, they all fall off with the inverse AFTER twice the diagonal of the modifier, ex – 8 foot octa falls off per ISL after 16 feet. The laser didn’t fall off within the measuring distance she used (200 feet comes to mind). The graphs of the light meter readings were included. Interesting side note was that the light quality went from soft to hard around twice the diagonal of the modifier.
Yep… the smaller the light source, the more sharply the transition between the true value and the shadow.