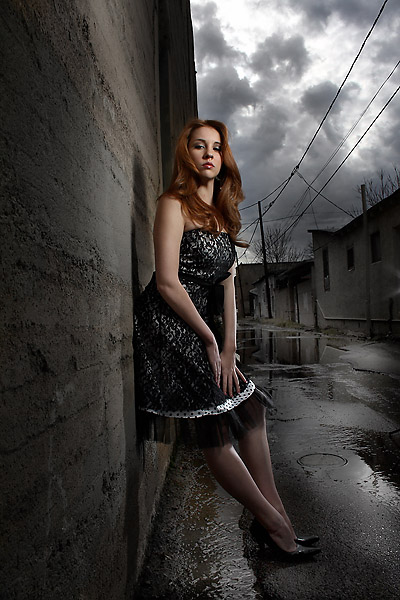
When I saw the alley I knew I had to make a shot there. The sun was coming straight down the little alley way and creating this nice little reflection in the water. The clouds were amazing and very dramatic. I began by finding the shot with Hayley. I moved her from several locations until I found the shot that would make the alley dramatic, catch the reflection of the sun and allow Hayley a spot to lean against the beat up wall.
The colors of the buildings were very muted, but I further muted them in post-processing.
I loved this sort of retro looking dress that Hayley had. It has that lace thing going on and the colors were muted as well. I knew that I wanted to use that mane of red hair to make the color statement of the image.
Creating the Lighting:
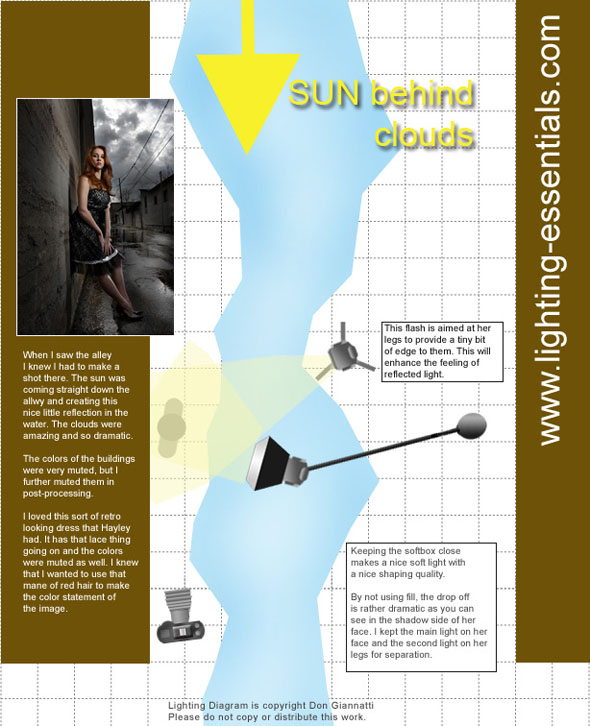
The main light is a small softbox with a speedlight inside it. I had it on a boom so it could come in very close without getting in the shot. It was a bit tricky getting it to the right angle but once I was able to set the image the way I wanted it, we were able to place it perfectly. The second light was a bare speedlight from a bit behind the model and was low and aimed on her legs. The point of that light was to give a little highlight along the edge of her legs and dress. This ‘edge’ would help separate her from the background.
The exposure for the ambient with the sun behind the clouds was f-8.8 at 1/100. That is very close to f-11 at 1/100 so we will use that for our work here. I wanted to beat the sun so I knew I needed to up the shutter speed to 1/200 and that gave me 1 stop underexposed ambient light. Then I set the aperture to f-14 and that gave me almost 2 stops underexposed. All I had to do then was to control the strobe to give me f-14 at the distance we had. Starting at 1/8 power in the box gave us f-11, so we turned up the power to 1/4 and moved the box back about 8 inches. That did it and we had f-14. So I shot the image at 1/200 second at f-14 on ISO 100.

This shot came together rather quickly once I had determined the angle I want to shoot and had the idea in mind for what I wanted to acheive. It is extremely important that I pre-visualize the image. I simply have done that since I can remember. I see the scene in front of me and think how it will look on a print. I think about textures and light and use mental terms like ‘gritty’, ‘shiny’, ‘slick’ and ‘hero.’ This helps me establish the angle and lens choice. In this case I knew I had to have a wide angle lens so I could get those amazing clouds, the reflection in the water and all of my model. I settled at about 18MM.
|
Information for today’s photographer. From novice to pro, LE Magazine has it all. |
 |
 |
I had to make sure I didn’t shoot too fast with the speedlights on 1/4 power for the main and 1/8 power in the back light. I really wanted to make sure they would recycle fast enough and I wouldn’t end up with images that were underexposed. Exposure is critical in shots like this.
Thanks for visiting the Lighting Essentials Tutorials pages. Please let me know if there is something you want to see explained.


quote: “f-8.8 at 1/100. That is very close to f-11 at 1/200 ”
Sorry but I couldn’t help noticing. I guess you mean f-8.8 at 1/200 is very close to f-11 at 1/100.
Definately love your website though. Keep up the good work.
Jim
Thanks Jim,
You are correct and it has been changed. A small typo does indeed change the shot by one stop. Gotta get some new fingers…
😉