There is so much talk on some forums about the ‘softness’ of shoot-thru umbrellas and how much it works to provide a soft light. And there is certainly some truth to that statement… especially with umbrellas at a distance.
But finessed lighting that is done close to the subject finds that the shoot-thru umbrella has no ‘wrap’ to it, instead it scatters the light from the source instead of focusing the light. And those of you who know me, know that I don’t usually run in a ‘right’ or ‘wrong’ mode on lighting. I only want the lighting to be what you want it to be… and learning lighting from someone who tells you to always do ‘a’ to get ‘b’ will do you no good.
You must get out and work with the tools, see the results, tweak and repeat. And repeat. Learn what the light does, then reconstruct it to provide the light you want.
We are going to examine a couple of shots we did with both in the same light. I also shot the setup so you can see how simple it is, and what I am referring to with the light.
NOW: Workshop News.
We are so excited about the workshops coming up. Please let me know if there are places you want to see Lighting Essentials Workshops. I am looking to book July and August now. And, of course we have all the workshop signups working so you can get signed up and ready for the workshops in your area… from San Diego to Montana to Washington DC… even Nashville!
I hope you are aware of our new Lighting Diagram tool. It is awesome and really can help with sharing the diagrams with friends. Treat the grid as 1 foot square and be precise about placement.
Now, let’s go look at some shots with shoot-thru and bounce umbrellas.
First I took a reading of the ambient bright light by walking over to camera right to get some sunlight on the meter. I wanted around 1/1oo of a second for ambient sharpness, and it is well within the sync-speed of the camera. At 1/100, the ambient light was around f-8. I moved it to f-6.3 for the exposure because the f-8 rendered the background light too dark. I wanted a feeling of sky back there and I wanted the feeling that Bri was being lit by that sky light.
I set the flash to a distance of about 6feet from Briana and changed the power from my starting point of 1/8 power to 1/16 power, then moved the stand in toward her about a foot. At 6ft, 1/16 power I would have gotten f-8. I wanted it to match so lowering the power took the light down one full stop – f-5.6. That is not enough light, so I moved the light toward Briana a foot or so and that would increase the power of the light by 1/3 stop – f-6.3.
Now my backlight and my strobe created backlight match. NOTE: the sun is actually behind the building and setting much farther south – we are looking West here.
Here is the shot we did without the front light firing:
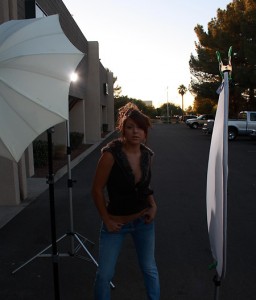
You can see that the backlight is even all around her. Speedlight is matched to the ambient backlight from the lit sky.
Here is the shot with a bounced umbrella:
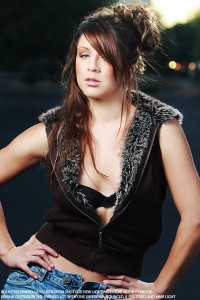
You can see how the light wraps all around her and creates a lot of light on her arm. That is because the light from the edge of the umbrella is lighting her arm farthest away… it is the wrap effect.
Notice how much light is hitting that bounce card on the stand next to her.
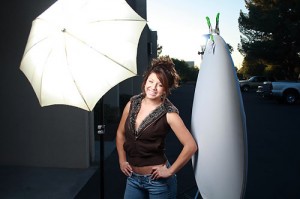
Now, compare that shot with this one with a shoot-thru umbrella. Here’s the setup shot.
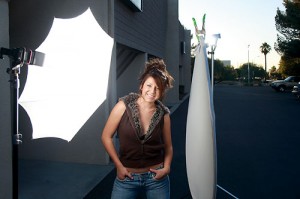
You can see that the image is more contrasty, with her arm going darker and the shadows under her neck and the dark side of her face being more defined.
Let’s get one thing straight, though. Neither one is better or not so good. They are both good representiations of the subject. It becomes a matter of choice… what do you want YOUR shots to look like. I can certainly see me using the shoot-thru umbrella and get the slightly deeper shadow when I want it. It is all about you creating the light you want and now you have another way of doing the shots.
A couple of things to see:
The diagram shows a couple of things. The light from a shoot thru falls away from the subject. And although it creates a soft light from size and diffusion, there is a dispersion AWAY from the subject.
Additionally you will see that the sides of the face and arms are not visible to that light source, so there is no light being thrown on them. There is some ambient, but in contrasty scenes, it will be less than what we see with naked eye.
The bounce umbrella, a parabolic in shape, keeps the light closer to the same distance from the subject. It also forms a light that can be seen from the side of the subject (wrap). While it is less diffused than the shoot thru umbrella, the bounce creates a more even light with the added wrap for cutting contrast.
I will point out though, that lighting for me happens close to the subject. Finessed lighting anyway. I want my lights to be as close to the subject as I can get them because there I can manipulate to results that can range from subtle to dramatic. Finesse.
Once the light moves out farther from the subject, it becomes a little less possible to finesse on that level, instead the addition of spots, grids and such are more useful for creating finesse.
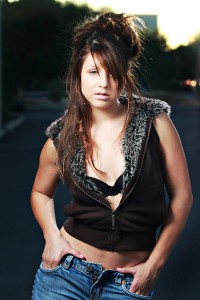
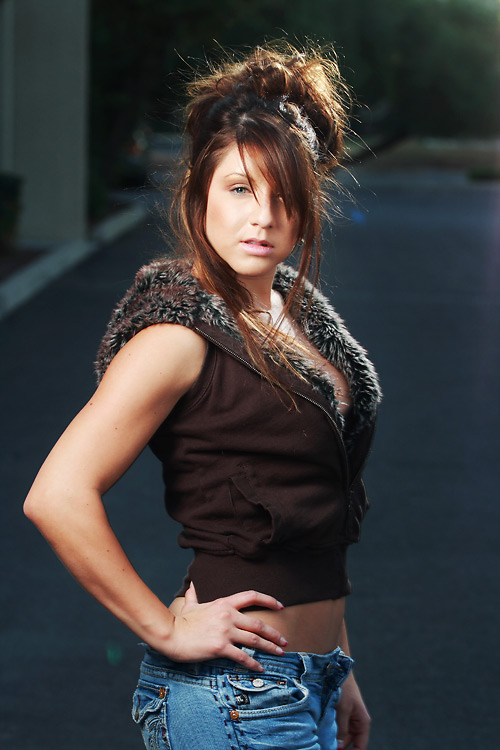
Here is one last setup shot. I wanted to create something that seemed backlit by the sun, but in actuality was lit by a speedlight behind Bri.
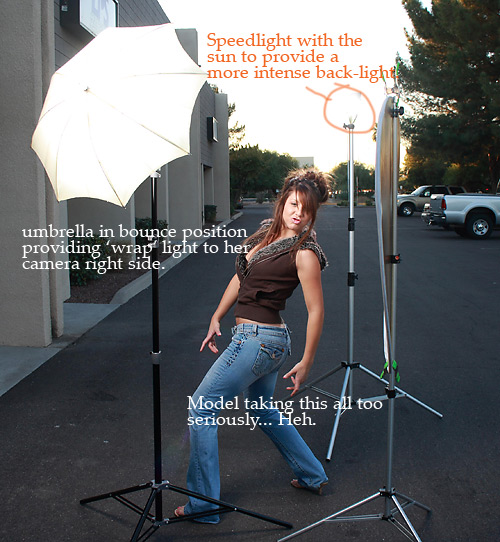
I wanted the backlight to very much match the front light and set them so. The difference is that the backlight is a hard light, and creating speculars as it hits shoulders and hair, and the front light is an umbrella giving soft, all over light. The resulting portrait is natural looking and inviting.
I love the look of this shot. It seems natural, and yet has a contemporary look to it that makes it a little sexy.
Look for our contests to be announced soon, with some great prizes and fun awards. For now, I am off to help pull wardrobe for a large shoot on Monday. See you on this Friday for another tutorial.
And remember to get our RSS feeds for automatic notifications of new content.






I have convertible umbrellas, but have been using most of them in a “shoot-through” mode – mainly through fear. I shoot weddings and have been living under the knowledge that “shoot-through” equals softer light, softer light equals more romance, more romance = more wedding sales – see the cycle?
I like the wrap that the traditional bounce gives. I think I’ll give it a try on my next shoot. I tried a bunch of new setups with speedlights last Saturday night in our hotel room in Vancouver – could use work, but was a ton of fun!
http://www.flickr.com/photos/devbox/3247695736/ as a sample
Very good tutorial. I am still fond of the wrap look but the shoot-thru has a few things i can use. I look forward to posting some of my sample. Which i will do this weekend and post them to the Flickr group. Thanks for taking the time to put this together.
The takeaway I took from this is the head puts out the same volume of light, the bounce just focuses the light in a more direct manner. The shoot through speads a little thinner over a wider area, wasting most of it ouside the area of the model in this case…correct? or am I still lost?..lol
Dan,
You are correct in some of what you say.
However, if you look closely at the shoot thru shot, you will notice that the light simply starts to fade away from the center. The light source curves away from the subject becoming farther away at the edges. That means there is a slight hot spot in the middle.
The bounce wraps the light farther down her body, around her arms and on the top of her head a little.
That makes different light that could be chosen for a variety of reasons. I do like that hot center area of the shoot thru and have used it a couple of times recently.
Additionally, grabbing all that excess light and adding it to fill cards on a shoot-thru can make a very soft, incredible light.
Don,
In your example, the light source is placed at equal distance to the subject. However, in the shoot-through configuration, it is physically possible to position the light source closer to the subject, therefore making the apparent size of the light source larger relative to the subject. How would the results compare in this case?
Also, generally speaking, is it more efficient (ie. lose less power from your strobe) to bounce or shoot through an umbrella?
Thanks for all the great info!
Ed.
I like how you use the illustration as a diagram to show how the light penetrates through the umbrella and how it also shows the light bouncing. This was a great post.
Edwin,
Yes. I wanted to keep it apple to apples. The effect is still the same though. The closer the light source, the faster the fall off (ISL) and unless it is a fairly large shoot-thru, and there are some, the angles of the light still move away from the face instead of toward the face.
I would say that when I use a shoot-thru, I actually have it farther back from the subject than I do the bounce. I like the ‘poppier’ middle area (hotter center) but want to get it far enough back so that middle area is larger on the subject.
As far as power loss, it seems to be similar when kept at the same distance. At least on my satin-white umbrellas. They are my choice in most instances.
It is true, however, that because the shoot-thru has no rod protruding, you can move it in closer. In brighter ambient situations, it may be the only option.
Thanks for the comments all,
–don
Great comparison Don.
Don –
This really is a great piece you put together here. The pros and cons of these two lighting methods have been debated in the strobist group on flickr, but you have really provided great sample photos with a graphical explanation of how the light is dispersed.
Question…If I was shooting a fitness model (where we want shadowing to show muscle definition) would it be best to use the “shoot through” method so I would have less wrap?
Swet,
I have used large softboxes and large umbrellas to do this. I think that I love the larger boxes at the side for fitness models… sculpt the body instead of just lighting it. Then, the addition of a bright, snappy light from opposite back to add an edge could be very cool.
I have not used a shoot-thru for that kind of a shot, but I would think it would fall somewhat differently than either the box or the bounce. Give it a shot and be super critical. Then turn it around and make the best shot then.
I do tend to use the smaller umbrellas for shoot-thru, though I don’t have any real reason why. Just my little idiosyncrasy maybe… or the more focused light effect.
–don
Great article! Thanks for the side by side, setup shots, and diagram explaining the light direction!!
Interesting you mention using a shoot through further away to make the hot spot larger. As a complete newb, and reading closer = larger = softer, I tried that with shoot through umbrellas, and found the hot spot overwhelming. I knew there must be something I wasn\’t getting, and you have not only confirmed what I was seeing, but explained it in a way even I can understand!
Thanks again!!!
You are spot on that none is right or wrong. I use my umbrellas both ways also depending on what light I think is useful. A lot also depends on size and material so as you say go experiment 🙂
You are the man Don. I never wanted to shoot bounced but now I do. Will it look the same shoot thru with a reflector?
Don,
Great article. I’ve mainly used my umbrellas in the shoot-through configuration, but looks like I’m going to have to try turning them around. I noticed that in these shots you don’t have the black backing on the umbrellas–do you find that having them on has any effect, other than I assume reflecting more of the light back requiring a little less power?
Dave.
Never see much of a power drain without the black. To me it is to help prevent flare. I use them religiously. For this exercise I used the same one so it would be apples to apples.
Thanks for visiting.
Thanks so much for the demo and comments. I found them very helpful and a springboard to work from. Above all I\\\’m getting the advice from all sides – \\"there\\\’s no right or wrong lighting\\" and \\"practise, practise, practise.\\" Thanks again.
I prefer the bounce approach. I hate using a shoot through umbrella. I find it inconsistent, but better direct light of course. Bounce is far easier to set up in my line of work and I can change the angles a lot easier.
Great article! I love the light in the last shot.
Brilliant article.
Thank you so much for the examples and explanation.
It was a very educational and enjoyable read.
I look forward to playing with my reflecting umbrella when it arrives.
Thanks again!
http://google.com
What a GREAT tutorial. I have looked at many as I am on the verge of buying some lighting gear. These set ups are so clear and the tutorial is so easy to understand that I am now really keen to get started! Thanks so much for making a rather daunting step seem easier. 🙂