USING A LIGHT METER AND "PLACING" THE PHOTOGRAPHIC EXPOSURE
YOU WILL HEAR A LOT OF PEOPLE TELL YOU THAT YOU DO NOT NEED ONE. DON'T LISTEN TO THEM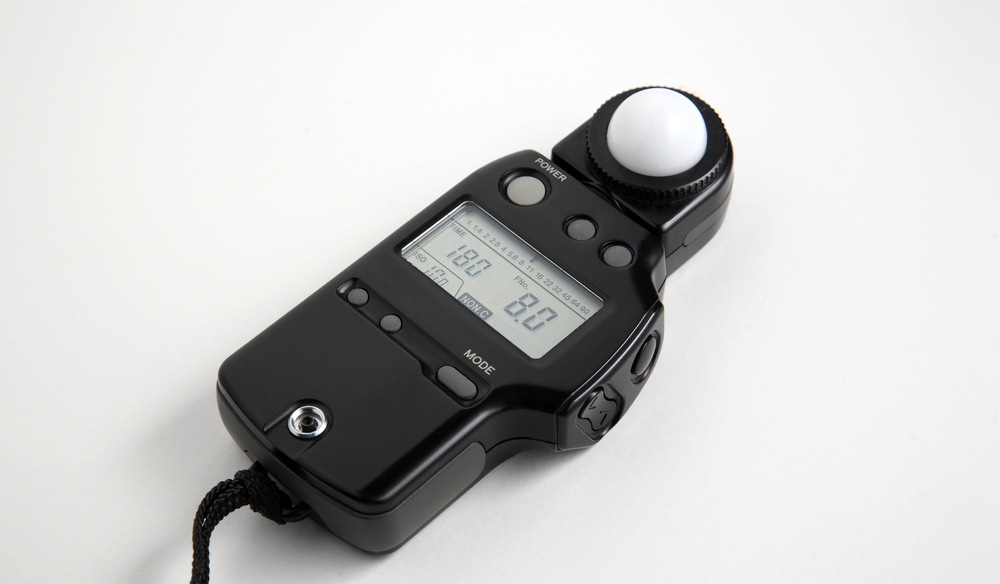
Using a Light Meter and “Placing” the Photographic Exposure
Using a Light Meter to Place Exposure: PDF
Meters. Some people hate ’em. Some people love ’em. But a lot of people don’t know what they do or why they should have one. Well, the gloves come off on this one. At Lighting Essentials, we LOVE light meters… they give us control that no chimpin’ can… and we can use the knowledge they give us to tame even the most difficult lighting challenge.
We will have a lot to say about meters in this post, so grab a cold one (or for my Toronto, Detroit, Boise and Pittsburgh friends… a warm one) and get ready. We are gonna talk about meters and how to use them for repeatable and perfect exposures. More after the jump… lots more.
I received a note from one of the workshop folks from earlier in the year. He was employed when he took the workshop, but a few weeks later found himself able to ‘pursue other interests…” Beng laid off suddenly can be a real wake-up for most people. “Without taking your workshop, I wouldn’t have known where to start. But having the information you taught me made me confident enough to go out on my own. It isn’t easy… but we are doing better than we thought we would have a year ago. I will match my old salary within a year if things keep going as they are. Thanks for the information and encouragement to just go for what I wanted to do all along.”
Anyway… let’s hit the road with this meter thing. I love my beat-up old Minolta Meter and wouldn’t leave home without it. Here’s why…
Meters have been the subject of many discussions pro and con recently. I offer my assistance whenever I can, but lately, the noise about not needing them seems to be quite loud. OK… I can tell you seriously that if you really don’t need one, then, by all means, don’t bother. If it is working for you, then fine. (However, I will say that 9 out of 10 people who tell me they don’t need them don’t know what they are missing… they never had the power and control a meter can give. Sorry, but there is a hell of a lot a chimp and a histogram won’t tell you.)
I like using a meter. I have had many. My current one is a meter I bought a long time ago. The Minolta Flashmeter IV has been with me for nearly three decades now. New juice and a nice place for naps and it is a trusty friend and I-got-that-light-for-you assistant. It has been dropped, left behind, lost, found and sat upon. Spilled drinks nearly killed it one night in LA, and the sands of the Mojave left it with less luster and shine.
But I push the button and it tells me the exposure. Or at least the exposure as it sees it. I determine the final settings based on what it tells me is the ‘mean’.
Someday I will write about how much the Zone System study that I did helps me today, but for now, I will only say that understanding what the meters see is so damn important. They see a middle gray – 18% gray to be precise. They have to have something to ‘base’ their exposure on so they choose the middle tone to do it.
Reflective meters DEPEND on something in the scene being middle gray, and they DEPEND on you to know what that middle gray thing is. Wedding dresses become middle gray when exposed ‘to the meter’ with a reflected meter. The meter sees the dress and calculates the correct exposure for it to be middle gray. Guys in black tuxes? No problem says the reflected light meter… shabam… middle gray. That is the job of the reflected light meter… to tell the photographer what exposure to use to render the subject ‘middle gray’.
If you know what to point your meter at, you can then use it to determine your exposure exactly. Let’s look at a scene with middle gray in it… and exposed for that luminance.
This photo of the “George Patton Museum” in California was taken in direct sun. I metered the exposure with the built-in meter (reflective) and chose the medium toned rocks as my center-weighted target. They were what I deemed to be middle gray, so I exposed at the camera’s suggested exposure. If I had chosen the lighter band above them, then the image would have that band placed at middle gray and all of the tones below it would move down one… taking the dark grays into black and lowering the light grays into the mid-gray tone.
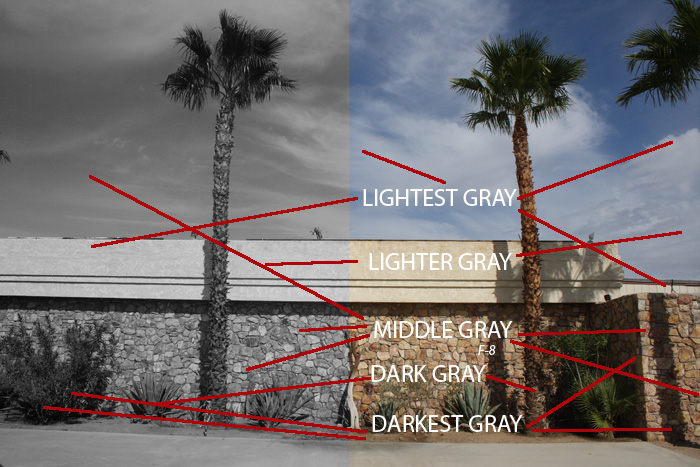
If I had conversely chosen the dark gray part of the wall to make my exposure, that area would have been moved to the luminance of the middle gray rock and everything above it would move up… overexposing the highest lights into white and creating a dark gray bottom where black should have been. One stop can do that.
I use a reflective light meter when I am physically in a different light than my subject. For instance… If I am on the Golden Gate bridge and it is currently in the fog, and I look East toward San Francisco – currently bathed in beautiful sunlight – I use a reflected light meter reading. I look for something in the scene that I want to be middle gray, place my center-weighted meter on that and get my exposure… moving the camera to get my composition. Reflective light meters are subject sensitive… they move all over as you move along the scene so you must choose wisely.
All of a sudden the fog clears and I am standing in the same light as the city. Now, I pull out my trusty Minolta meter and using the ambient setting, I aim the ball at the direction of the camera and take a reading. That’s because the same light that is falling on the city is now falling on me. So I can get a reading of the city by simply getting a reading of the light that is prevailing on both me and the city.
Incident light meters (with the little ball on them – or with the ball in the main position are ambient light meters) measure the light falling on the subject and tell you what the middle gray exposure is even if there is no middle gray in the picture. It is subject neutral. The meter doesn’t vary as you move it around, as long as it is receiving the same light as the subject… it doesn’t care what is in your frame. It is giving you the correct exposure for the scene as it is being rendered by the light. Subject-centric photography… I have mentioned that before. How the subject receives the light is the most important aspect of it.
How do you decide where to point the ball of the ambient light meter? It points to the camera for taking the overall exposure. You can use it toward the specific light/shadow when determining the ratio or fall-off of the light. Subjects are three dimensional. The ball is three dimensional. It should receive the light just as the subject receives the light. The angle of incidence will alter the exposure from camera, so keeping the angle of incidence on the ball the same as the subject renders the correct exposure. Or at least the meter’s baseline of ‘correctness’.
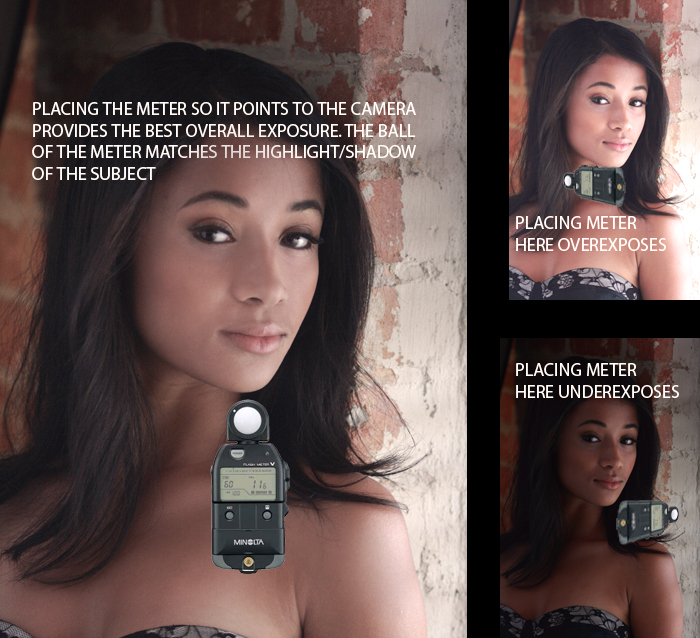
Notice the placement and angle of the meter for gathering correct information.
Notice the upper right image. The meter was aimed at the shadow side, receiving no light from the window. So it gives us an exposure to make the shadow side middle gray. That renders the soft window light too bright. But if we meter the window light only, without taking into effect the way the light falls and angles to the camera, then the exposure is to render the window light as middle gray and the entire image is underexposed.
We take the reading from the middle of the face – the ‘transition’ spot of light to dark – and we make sure the ball is aiming right at the camera. (Look… I get really focused here… Right at means RIGHT AT…, not a little off or a little down or high… be precise. PRECISE.) This exposure then, is right on and renders the image in a pleasing, wide tonality that speaks to the lit and shadow side of the image.
Now you can choose what to do with that information… You can choose to shoot the image dark – ‘placing’ the exposure to the darker side if that is your taste. Or, if you want to expose the image a little lighter – or a lot lighter – you can. That is called placing the exposure.
(A word about exposure. In film days we exposed for the shadows and developed for the highlights. These days I do something we call “Shoot to the right”. It means I like to shoot a bit brighter with the histogram, not going to the darker. I can pull more from the lighter capture than I can from the darker, muddier version. There is a lot more on this here, and here.)
Let’s look at a few case studies here for some ways the meter has been used to give the information to make the decisions on what to set the exposure.
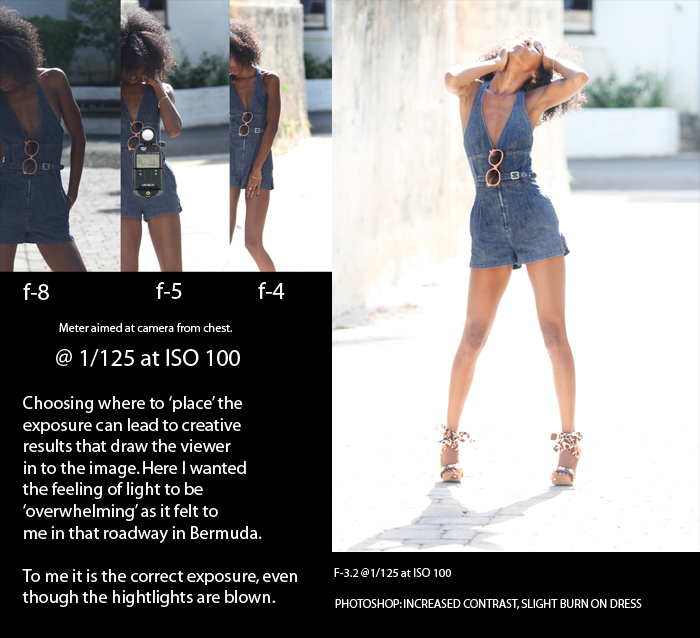
I chose to let the bright highlights blowout for this shot in Bermuda
In the image above, taken in Bermuda, you can see the different snips of exposures. I started at what the meter said, but quickly decided that was too dark. I wanted the FEELING of the light I was experiencing in that little roadway. I chose the bright exposure to make the set of images and used Photoshop to bring a little more detail out of the dress. At this amount of backlight, it becomes a source in itself and I am simply shooting into a ‘flare’ situation. And flare I got. However, it is that flare and bright light that makes it feel so powerful.
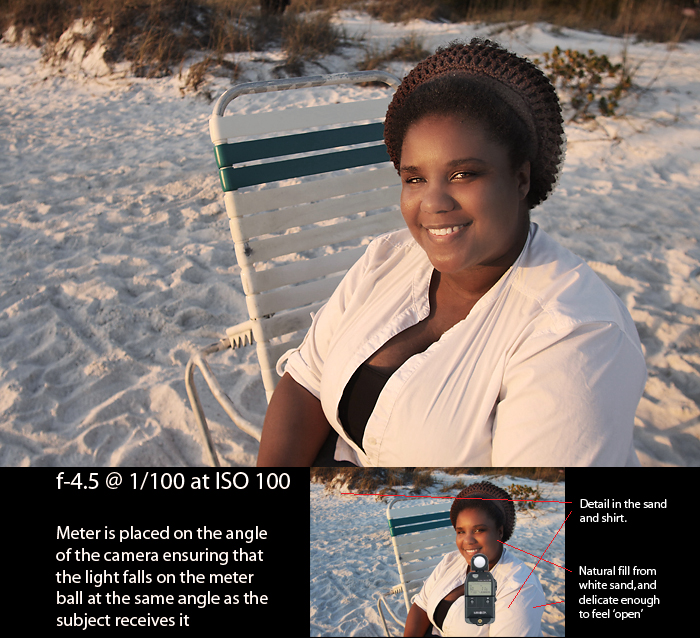
A simple photograph of our MUA with late afternoon sun. A simple ambient meter solution.
I simply love this late afternoon light. The subject is sitting in the warmth of the sun and wanted to get a nice, simple portrait. By holding the ambient meter with the ball facing the camera, I nailed the exposure with a click. The highlights are still with texture and the shadow side is still delicately lit from the bounce of the pure white gorgeous sand of Anna Maria Island.
I could have chimped it you say? Really? On a bright, white sandy beach in the sun? OK… maybe, but I have found that it is damn difficult for my eyes to adjust to that screen in the middle of what seems like a light source. I didn’t have to chimp it with my trusty Minolta…
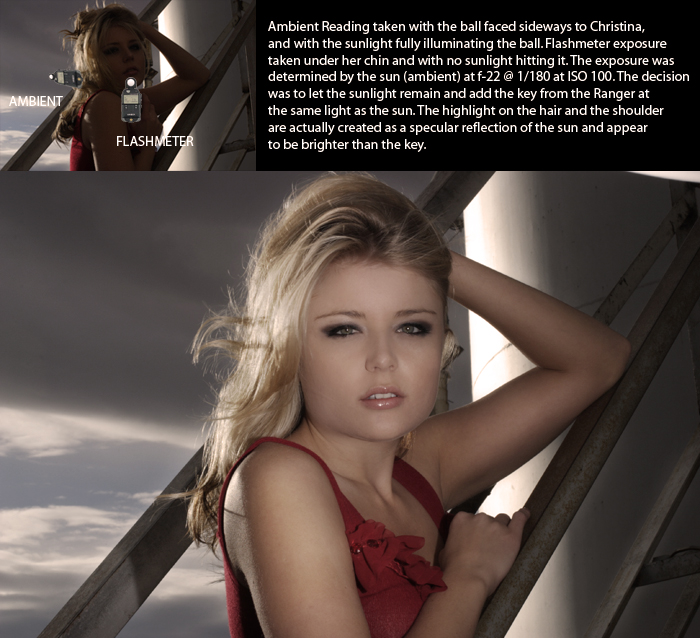
Adding a flash to the mix is easy with a meter that gives you the exact information you need… when you need it.
The metering of the shot of Christina was easy. I took a reading of the sunlight falling on the side of her face just as it fell… with the meter turned to the side and receiving the light from that angle. I then moved the meter to the front of her face and took a reading with the Ranger in a beauty dish. We simply moved the dish in to where we wanted it and dialed the power down till we got to the point where the Elinchrome’s reading was the same as the sun.
You will notice that the light seems brighter from the backlight sun. That is because the angle of the sun presents the light as a specular (angle of incidence – angle of reflection) and as a specular, it seems brighter. The reflected light source is pretty cool when you control how it works.
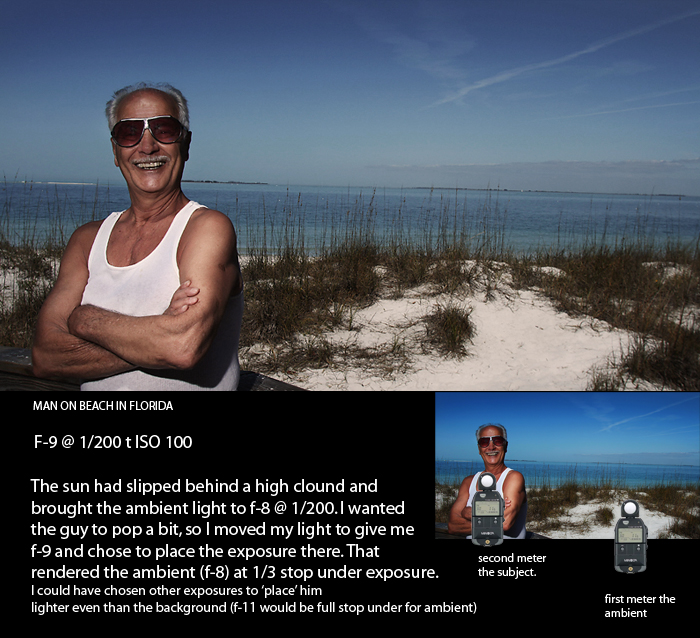
By placing the exposure at 1/3 over the ambient, we can mute the world around our subject just a bit
I loved this guy! I decided I wanted the ambient world to be a bit muted, so I took a meter reading of the light falling on the beach. I placed it at a point to be 1/3 under-exposed. Then I moved the light into the scene to provide the exposure. It is 1/3 over the ambient, but that is what I used to place the exposure for the image.
Placing the exposure lets me determine where I can put the ambient in regard to the subject. Flash adds the ability to create a source that is not related to the ambient, so it gives the photographer another creative ability to make the image look the they want it to look. Shutter speed is used to control the ambient and the power/distance of the flash is used to determine the exposure for the subject.
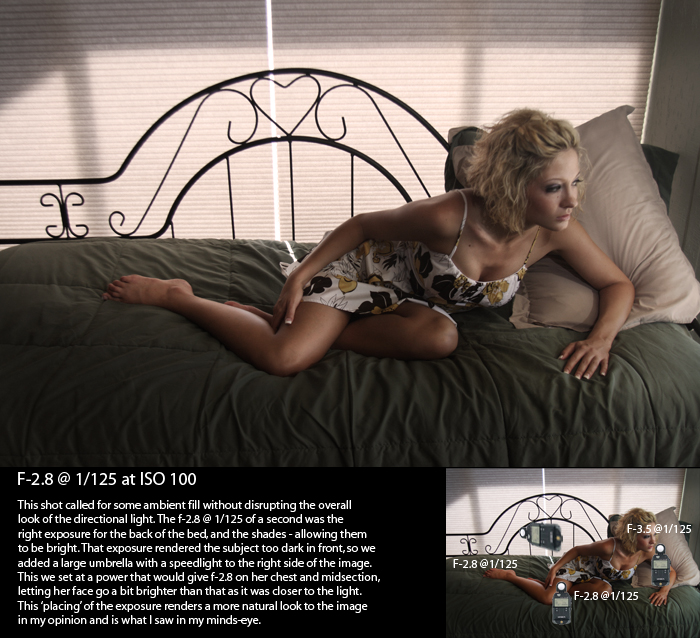
Placing the exposure at the middle tones of the shot allowed the face to actually be a little over… and that ‘sells’ the idea of the light.
This is a really fun shot. The sun is coming in from behind her, and I wanted the feeling of a second light source catching her attention. I metered the shot and got the basic exposure by seeing how much light was coming in from the window and falling on her legs. I checked it with a ‘chimp’ at that exposure and that confirmed that I liked the way it looked.
I added my key light with a speedlight in a bounced 43″ satin white umbrella dialed down to give me f-2.8 at the midpoint of her reclining figure. That made the face closer to the light a bit brighter, and that made the shot look real and accessible. If I had placed the exposure to the darker exposure it would have looked more ‘flash-lit’ and not as natural. Placing the exposure to render the tonalities where YOU want them is one of the creative ways you can control your image and make your shots yours.
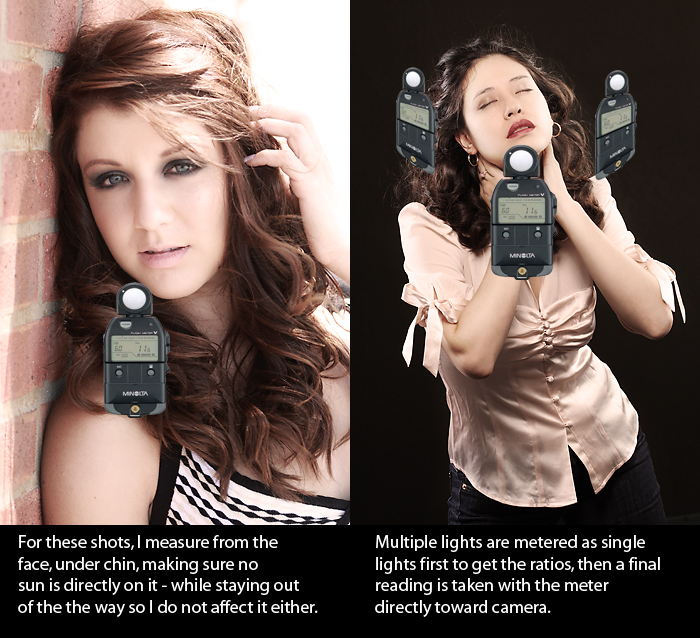
On the left is a simple natural light exposure and on the right is a more complex three shot reading.
A simple headshot of Briana in Chicago with ambient, backlit sun is very easy with a meter. I moved in close and placed the meter under her chin for the reading. I stood way to the side so that there would be no reflection – positive or negative – from me. I wanted the ambient light on her face to be all that the camera would see and of course, kept the ball aimed at the camera position. The extreme backlight blew out some of the hair, but I don’t care. I love the look.
With the shot on the right, I used two shoot-thru umbrellas on each side of Lynn and a medium umbrella to the front of her. I used the meter and one light at a time to make sure the side lights were 1/2 over the front light and even. Simply turning the other lights off let me make each side light perfect, then add the front light. You may have to adjust a little after all three are on, but that is made easier because of the precision of the light settings possible with the meter. Honestly, don’t know how precise you can get without a meter, but I sure do know how you can with one. Fast.
I chose to make the exposure based on the main – key light – and let the side lights be brighter by 1/2 stop. Placing the exposure at the key to ‘bring up’ the side lights gives the shot its expressive look.
I hope that I shed a little light on how to use the meter (heh, sorry) and that it gives you some ideas on how to use your meter a bit more, or why you should have one anyway. See you next time, and as always… please let your friends know about this article and site by using the sharing buttons on the top of the right column.


Great article Don! Even with today with digital cameras. meters have their place.
Thanks!
Jean
This is a great article. I always encourage the people that ask me about lighting to get a light meter and learn how to use it!
I won’t leave home without my lighting meter – great and invaluable tool for the bag. Great article, Don!
Great article! I’ve seen a few of these arguments for and against. Your article has just convinced me to add a light meter to my wish list of gear. I can’t wait for the Toronto workshop.
FOSLE discount code not working at this time. Aside from that, very cool article.
Thanks for the detailed diagrams and well thought out examples, nicely explained, I use a spot light meter, and don’t often use an incident reading for ambient. Maybe I’ll give it some time as I can see it being a bit faster than spot metering. Maybe your next tutorial could be on shooting straight horizon’s?
Excellent info!!!!
great article thanx
Wow. I read the article once…then had to read it agan. I’ve been looking for an in-depth article about light meters for a long time. Thank you!
Great article. Thanks for this.
Really nice Don great article 🙂 I think this is the most complete guide to using a lightmeter that also adds so many possible scenarios, great work!.
Don, in one short article you\’ve provided more useful information on metering technique than the entire Sekonic website. Thanks.
Very useful article! I\’ve been thinking about getting a light meter, because I\’m such a perfectionist when it comes to photography and I\’m finding that chimping and using the histogram alone is not really doing it for me, but having never used a meter before, how to use one is still mystified in my mind; your article has helped to demystify it for me. Thanks.
Great article. Loving the blog, excellent info! Thanks so much!!
I am SO glad I found this website, very good stuff here…. already bookmarked. Thank you!
Great article ! You mentioned you might consider Raleigh…… well, i’m IN Raleigh and I can tell you that you’d have a packed house here! Please come!
Well done, great explanations, and truly helpful!!
Thank you!
Hey Don! Great article. I need to pull out the Sekonic that I’ve had with me at every shoot but neglected. Now I think it will be a great tool in my arsenal! It’s great to see shots so close to home, looks like you’ve even been out here to Maricopa. I may have to come by and visit you when you are in town!
Wonderful article, thanks. However, 1 more concept I hear thrown around I do not understand. Isn’t there 1 more reading on most modern meters? What do photographers mean when they talk about the “% of ambient light” reading on their meter? I don’t get it.
Don, thanks for another great article. I’d used a meter a little in college, but was never actually taught how to use it! Your article has really ironed out the theory and encouraged me to invest in my own meter.
Any thoughts of running a workshop in the UK?! If you do, then I’m there. Cheers.
I could’t be agree more as this article is superb! Few things I want to ask: Is it better to use “spot metering” in stead of “center-weight” when measuring the reflected light from the subject? Will it give more accuracy on metering? Thanks!
For in camera metering, I use spot most of the time. This allows me to use the camera as I would a “Spot Meter”. Taking the readings from the places within the scene, I can quickly determine where the ‘Zones’ are and also determine where I want to “place” the exposure. I have used “Center Weighted” only as an option when the scene is rather flat and I am using the camera in some sort of “auto mode” as a sketching tool or snaps of the kids.
Thanks again!
Great article about light meter Thanks for sharing Jen
Just saw this article July 2010. Thanks for the great article and enlightening information.
After years of relying on the internal meter of digital cameras, I’m convinced a hand-held is the answer to exposure issues. From now on my Sekonic L28c2 and L758DR meters will be “standard equipment”, plus my plan is to study the zone system as well.
Just found this site from the Strobists group on Flickr. Great article..EXACTLY what I have been seeking for so long. Thank you!
Learning to use a light meter via this post and your workshop was the best thing I ever did for my photography. I no longer have to “guestimate” exposure from the histogram. I KNOW what the correct exposure is and how to generate the lighting ratios I want without guessing. Thank you for sharing your wealth of knowledge!
I really enjoyed reading this post, especially since I still believe a good light meter is an essential piece of equipment for photographers to not only learn about the nature of light but also how they can manipulate it to their own advantage.
In the past I have used Minolta, Gossen and Sekonic, which all delivered identical readings, so I really don’t think it matters what brand of meter you choose as long as you get into the habit of packing it in your bag and then using it whenever possible. Nowadays I have the incredibly handy little Sekonic 308B that easily slips in your pocket and the more professional L-758D that can be calibrated to the individual camera sensor. The latter is a bit special but I would thoroughly recommend the 308 as a good choice for those who are reluctant to use a meter simply because they don’t want to carry around extra equipment.
Great article. I bought a Sekonic L-358 meter and this article proves to me I did the right thing. So far I
haven’t done anything like this, ( I have been using it mostly for flash lit table top photography ) but I can
hardly wait to get out and try something like this.
Thanks a lot, Tony Traub.