I use my speedlights frequently when on location, but truth be told I would rather have a more robust selection of tools to modify the light. I will admit to sucking pretty bad at the DYI approach. I will simply not go into a shoot with grubby or ‘home-made’ equipment unless it really looks compelling.
That all changed with the tools that I am telling you all about on this post. There are softboxes, softlighters, grid-spots, bounces, color filters, barn doors and even some little softlight tops similar to the Stofen. The Speed Light Pro Kit is an amazing set of tools and modifiers at a price that anyone can work with.
Here’s the cool thing, at least one of the cool things, they all fit flat into a tiny space. I can throw them into a small bag or my suitcase and be off knowing I have enough modifiers to do the job. From small softbox, to tightly contained grid-spots, I have enough gear to be effective with my lighting for most challenges.
This will be an bit different post. I will run it until this weekend, updating as I go along with new images taken with the different tools. Saturday will culminate in a webcast where you can ask questions and I can show you how I use them. We are scheduling the webcast for 11AM on Saturday, Phoenix, Arizona… we are on Pacific Time here, so mark your calendars appropriately.
There will be a link here on Saturday morning, March 21, and you will be able to click and visit the webcast.
Some items before we begin. Upcoming workshops are filling, so get signed up. We are very small in our groups, and that gives us lots of shooting time as well as learning the tools and techniques that will lead to more control in your lighting.
Let’s start with what is in the package:

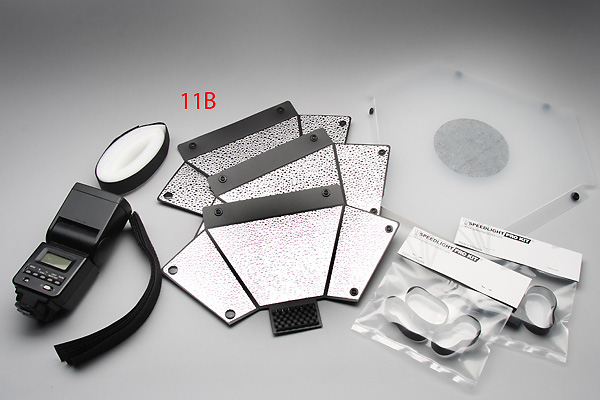
The kit comes well packaged in protective sleeves. On the above illustration we have:
1 Medium Grid Spot
2Tight Grid Spot
3 Medium Soft Box (2 included)
4 Medium Soft Grid
5 Medium Soft Box two pieces
The Grid Spots are well made, and very smooth with the spot effect. There is a very tight beam and a medium beam included so you can have both in one shot if you have enough speedlights. The light is clean and the build is solid.
The two medium softboxes have a soft panel and a grid pattern. The interior of the boxes are covered with a silver, slightly studded material that really bounces the light in and around the box. The diffused softbox has a double layer of diffusion built in to the unit that gives the light a very nice effect. The medium grid spot has a wider throw than the smaller grids, but there is a softness that is added from the interior silver material.
I put my 430 in the shot to give you a sense of scale. You can see that the softboxes are fairly good size for the small light tools.
The second image shows a speedlight bounce tool (6) that fits on top of the strobe and has versatile mounting for changing how it works. You can choose to use it as a diffuser or a bounce tool, and you can shoot through it or have it above your strobe for a lighting modifier.
7 shows a set of color filters for the medium softboxes. They work really well and are great for effect lighting. Pop one behind the medium grid and get spot color effects. 8 shows the barndoors (2 sets) that can be used with the medium softboxes to control the throw of the light or flag off any unwanted spill.
9 is an assortment of colored strobe toppers to soften and color the strobe light. They attach very quickly and do a nice job with the softening of the direct flash. 10 is some extra softeners that come with the kit. You have enough soft lighters to handle a half a dozen speedlights.
Group three shows the larger softbox that is included, as well as the different fastening tools to keep it on the flash. Setting this light up takes about 30 seconds, and the light is really smooth. They have included a silver cover in the center of the softbox to keep the highlight from being too center weighted. The 430 shows how large the softbox is in relation to the strobe.
I very much like the shape of this large light. While not a square, it gives a slightly more rounded catch light in the eyes. The unit is solid, with a good build. The light is clean, and open and the softness is wide and bright.
Below you will see the light assembled and its size in relation to the speedlight.
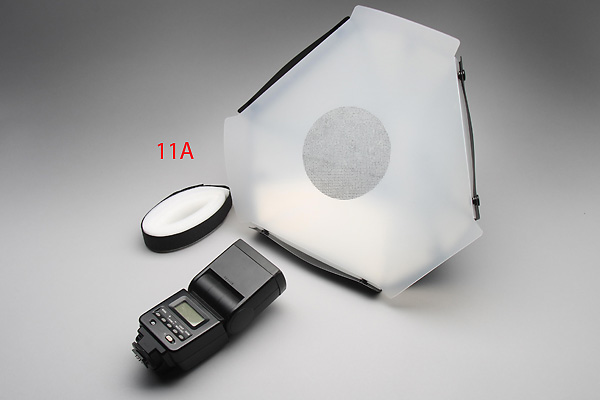
With this high quality, widely diverse and easily packed set of tools, you can go into a lot of situations with some confidence that you can have the main and effect light that you want. It is a well designed set of tools that can modify any speedlight. There is no compatibility issues and the tools look professional enough to go on a pro shoot.
The durability and build seems to be very strong. I can imagine that they will take some punishment, but they are not indestructible. As with most things, care and proper use / storage will increase their longevity. The snaps are brisk and the material is very sturdy. They lay flat in most cases, only the grid-spots wont lay flat.
You can visit the Speed Light Pro Kit site here. They are offered in the US at MPEX, and are available now in other parts of the world. See the website for more information.
EDIT: The products shown here came to me as a single unit. They are sold as groups and individually in different ‘packages’. I do not sell these items, but I do recommend them at this point. You can buy the full set of tools, or just the tools you need. The great folks at MPEX can help you configure the right set of tools for your needs.





Hmmm this is really interesting, I like how compact it all is, only thing is I think your missing the kitchen sink….
Bec,
It is really amazingly compact. And everything stores flat.
That is to cool, I look forward to seeing how you like the new gear. I also wonder about it\\\’s durability any info on that?
These products do seem to be worth the purchase. I was expecting a bigger price tag than what I saw when I opened the link. But to my surprise, you were right with the “anyone can work with it” price. Great find! Cant wait to see what you come up with.
I first saw this product on Flickr and have been trying to learn more about them ever since. So your article is great, Thanks Don!
Any feel for how the day to day flexing of the product will affect it’s longevity? The Fong Origami was a great modifier. It worked great and folded up flat to fit in the bag. Unitl one day it folded one time too many and broke off.
Thanks for this great review Don. I have been waiting for this since you mentioned that you would be doing one in a flickr strobist thread a few weeks back. I also hope to see your webcast on Saturday!
I signed up for your Washington DC Workshop in May. I have been studying and practicing. I want to be as prepared as possible for it so that I can gain as much knowledge as possible!
I just got off the phone with MPEX. I have a Prokit 6 Reflector and a Prokit Pro Set on the way to me. They didn’t have the gels or barndoors yet. They said they haven’t been released in the States yet but will be soon. I am looking forward to how compact these will be for carrying around on my day trips!
Looking forward to the workshop!! See ya soon!
Nice review, nice products, I hadn’t noticed the domes, I still like my diy “foldabounce” better 🙂
Richard
—
http://www.urban-exploring.com
oops, forgot the link to the foldabounce: http://www.oseven-fotografie.nl/urbex/2009/02/13/foldabounce-transportable-omnibounce-diy/
To be fair and clear however, not all of that is included in the Pro Pack. From what I can tell from the site, only the items in the first picture are in the Pro Pack. The rest are add ons that can be purchased. Not to say they aren’t neat and clean looking, but it would be nice to be clear on what you get for how much.
Hi Nathan,
I reviewed all the tools and did not mention price or configurations, nor what would be included in any price. I leave that for the retailers. It certainly was not my intention to mislead, nor do I want to have that kind of granular information in my reviews as that would make them subject to edits later as prices and configurations change.
whats the light loss like? does that reflector thing actually increase light a bit?
We found the light loss to be slightly less than the nylon items and a lot less than the DIY / homemade ones. We were doing headshots in the studio with the small box at a distance of 6 feet. Shooting at ISO 100, f-5.6 and were at 1/16 power. They really do rock. I will be adding some numbers tomorrow to show the light loss.
Very cool stuff! Wish I would have caught the webcast!
This review and the pics have convinced me to get the Pro Kit 6 tomorrow. It’s awesome how everything can be folded up and stored in a bag, (but I’ll probably need a bigger camera bag for that diffuser panel – which looks as if it doesn’t fold?).
4. Medium Soft Grid – is very good!